Sunday, October 11, 2015

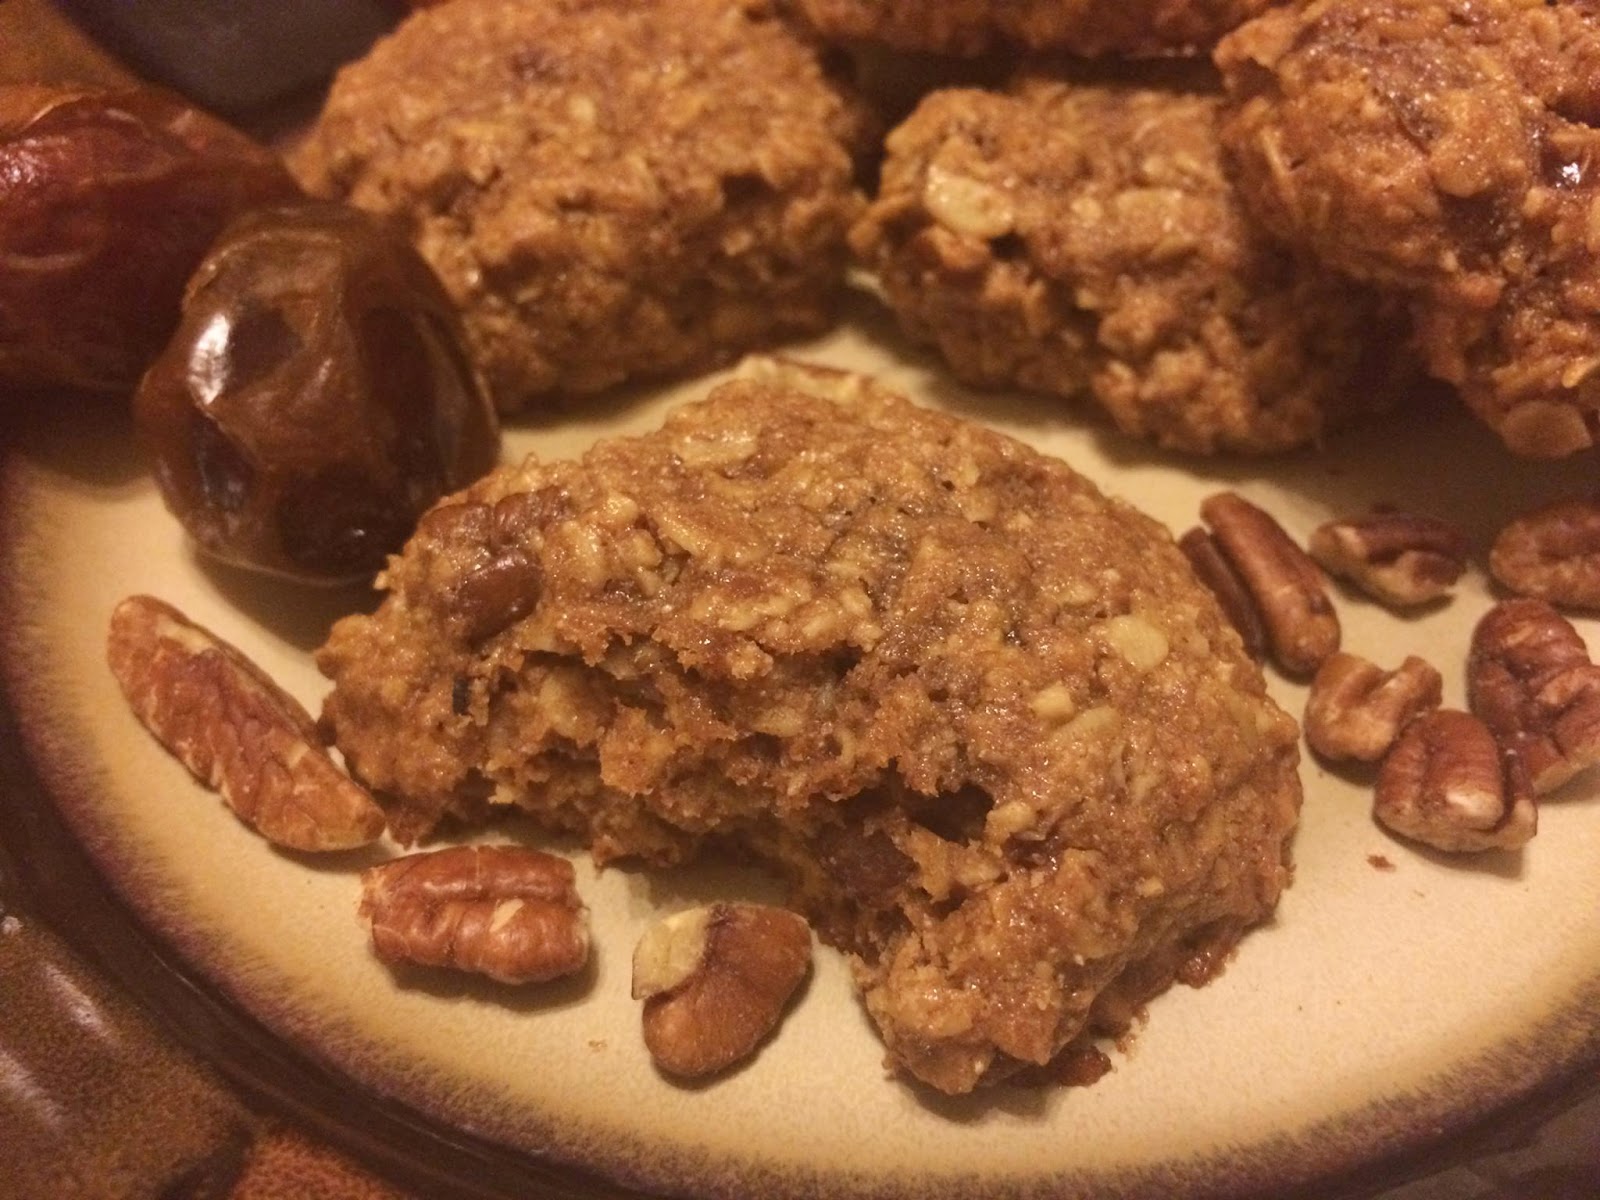
Maple Cinnamon Ginger Oatmeal Cookies

Hey everyone!!!! It's been forever since I posted anything new on my blog. I have been so busy!!!! I got a new job and have been dancing like a mad woman in some amazing shows, all the while still trying to rest and recover from a hip injury that happened last summer. The craziness never ends! But I am living life and I've been learning and growing every day. I am thankful for every moment. This recipe came about as a request from a dear sweet friend of mine. She had recently been put on a strict diet by her doctor and she asked if I could make her some delicious cookies that she could eat while still adhering to her diet. I am so happy with how these cookies came out they are one of my new favorites. They are sweetened with pure maple syrup and coconut sugar, dairy free, and whole grain, with a delicious kick of sweet spice from the cinnamon and ginger. Medjool dates and pecans add another layer of goodness to these gems. I can't get enough of them! This recipe could easily be adapted to a gluten free version by swapping the Spelt flour with your favorite gluten free flour blend, and make sure the brand of oats you use says gluten free as well. I hope you love them as much as I do. Happy baking!

Maple Cinnamon Ginger Oatmeal Cookies


3/4 c coconut oil
1c coconut sugar
1/2 c pure maple syrup (I used grade B)
2 eggs
1 tsp vanilla extract
2 tsp cinnamon
1 tsp ginger
1/2 tsp salt
1 tsp baking powder
1 1/3 c whole grain spelt flour (or gluten free flour blend)
2 2/3 c rolled oats 2/3 c chopped medjool dates* (about 12 dates)
2/3 c chopped pecans or any nut of your choice (roasted pecans add more flavor)

Preheat oven to 350 degrees F.

In the bowl of an electric mixer, beat the coconut oil, coconut sugar, and maple syrup on medium speed until light and fluffy. Set mixer speed to low and add the eggs, one at a time, mixing until combined. Mix in the vanilla.

In a medium sized bowl, combine spelt flour, cinnamon, ginger, salt, and baking powder. Slowly add the dry ingredients to the sugar mixture. Add the oats, chopped dates, and pecans. Mix until combined. 

Drop rounded tablespoons of dough onto lightly greased cookie sheets (I grease with more coconut oil or you can use parchment paper instead). Slightly flatten balls of dough with the palm of your hand or the back of a spoon. Bake at 350 for 10-12 minutes or until bottom edges are lightly browned. Remove from oven and let sit for two minutes before removing from cookie sheets. Transfer cookies to a wire rack (if you have one) to cool.  These cookies are delicious warm!!!

Makes approximately 2 1/2 dozen cookies.


Enjoy!!!! <3


*dates can be substituted with any dried fruit of your choice, raisins, apricots, figs, etc. There are no limits. ;)

Monday, March 17, 2014

Caramel Apple Almond Squares (Gluten Free)

Caramel, apples, and almonds, oh my!!!! These have got to be one of my favorite new creations. They have a rich and buttery caramel flavor accented by the nuttiness of almonds and are loaded with chunks of juicy apples! Perfect in the morning with a cup of coffee or a quick grab and go breakfast when you're short on time. And you know what's even better? There are no refined sugars in these puppies!!!! They are made with coconut sugar (which is full of nutrients and is lower glycemic than regular sugar) and organic honey. I truly feel fulfilled by feeding people good food! Please enjoy these treats and taste the love! <3   xoxox - The Belly Dancing Baker

Tastes so good you won't be able to stop yourself from shimmying!

Caramel Apple Almond Squares

1/2 cup organic unsalted butter, room temperature and cut into pieces
1 cup coconut sugar
1/2 cup honey
4 small or 2 large organic apples, skin on, washed thoroughly and chopped (approx 2-3 cups of apple bits!)
1 Tbl vanilla extract
2 large eggs, beaten
1/2 c unsweetened vanilla almond milk (My favorite is Trader Joe's brand)
1/2 tsp salt
2 tsp baking powder
1 cup almond flour/meal
1 1/2 cups gluten free flour

Over medium-low heat, in large saucepan melt the butter, coconut sugar, and honey; stirring with a wire whisk the entire time emulsifying the butter and sugar together into a smooth caramel. Please be careful while whisking, caramel mixture will be VERY HOT! Once mixture is bubbling and caramelized, add in the apples and let them cook for about 5 minutes, stirring occasionally to prevent burning. Remove saucepan from heat and let sit for 15 -20 minutes or until cooled to room temperature. The apples will continue to cook and release their juices into the caramel mixture.

When you're ready to finish the batter, preheat the oven to 350*F

Once the caramel apple mixture is cooled, add in vanilla, eggs, and almond milk, and whisk until combined. Set aside.

In a large mixing bowl, combine gluten free flour, almond flour, salt, and baking powder. Stir together until incorporated. Pour the caramel apple mixture over the dry ingredients and gently stir until combined, being careful not to over-mix, but not leaving any lumps of flour either. Tricky, I know. ;) Batter will be thin and runny with lots of chunks of apples! Pour batter into prepared 13"x 9" baking pan and bake for 45 minutes to 1 hour or until firm to the touch and knife inserted in the center comes out clean. Remove room oven and let cool 10 - 15 minutes before cutting into squares and serving. These are amazing warm from the oven, room temp, or cold straight out of the fridge.

Makes approximately 24 - 36 squares of appley delight.  Enjoy <3


***For muffins, spoon batter into prepared muffin pans (or any specially shaped bake ware of your choice) about 3/4 full and bake for 15 - 20 minutes, or until firm to the touch and toothpick or knife inserted into the center comes out clean.

***** Also, if you are allergic to nuts but still want to try these out, just substitute more GF flour for the almond flour, and replace the almond milk with milk of your choice. :)


Sunday, December 8, 2013

Gluten Free Lemon Cake with Raspberries and White Chocolate

Hey hey, everyone! Merry Christmas and happy holidays to you all!!!! I've got a slew of new recipes coming up for you all  the first of which is a delectable and delightful Lemon White Chocolate and Raspberry cake. I made this recipe for my friend Amar's birthday and it was such a hit that another friend of mine placed an order for it the very next day. ;) This cake is very moist, very lemony and has just the right amount of sweetness. I hope you enjoy it!


1 c butter, softened to room temperature
2 c organic sugar
2 tsp vanilla
1/2 c lemon juice (approx 2 - 2 1/2 large juicy lemons)
zest of 2 large lemons
1 cup plain yogurt (I used Greek yogurt for extra protein)
3/4 tsp salt
2 tsp baking powder
2 1/2 c gluten free flour (I used Trader Joe's brand)
1 1/2 c white chocolate chips
1 c raspberries (fresh or frozen)

Lemon Glaze

1/2 c butter, softened
2 - 3 c powdered sugar
juice of 1/2 lemon
1/2 tsp vanilla
Limoncello (Italian lemon liquor) or milk to thin

Preheat oven to 375*F. Butter and flour a non stick bundt pan and set aside. (Use the same gluten free flour used in the cake to dust the pan.)

In a large mixer bowl, cream butter and sugar until light and fluffy. Add in eggs, one at a time, mixing well after each addition. Add vanilla, lemon juice, yogurt, salt, and baking powder and mix well. While mixing, slowly add in gluten free flour; mix well and stir in white chocolate chips and raspberries. Pour batter into prepared bundt pan and bake at 375* for about 45 minutes, or until knife inserted in center comes out clean but moist. Cake will be firm to the touch and the top and sides will be golden brown. Remove from oven and let cool 10 - 15 minutes before removing from pan. Invert cake onto a plate and drizzle with lemon glaze.

Decorate to your hearts content, I used fresh flowers, lemon slices, a dusting of powdered sugar, and more grated lemon zest to spruce the cake up and make it oh so pretty!!!

Enjoy! And Shimmy on! <3

Monday, November 11, 2013

Gluten Free White Chocolate Pumpkin Blondies

Hello world!!!! This is my first new recipe and first new post of my blog in over a YEAR!!! Sorry I've been MIA. There have been so many life changes since I moved to San Francisco that I haven' been able to devote much time to creating new recipes or updating my blog, but that's all changing now. The Bellydancing Baker is BACK in action! ;). Anyway, back to the recipe!!!! This is my first recipe trying out a gluten free flour blend instead of relying on beans to make my gluten free goodies. I used Trader Joe's brand gluten free flour mix and it won my seal of approval! These blondies are very lightly spiced, because I had a few complaints about my pumpkin bars being TOO spicy from a few people. If you like more spice feel absolutely free to up the amounts. These delicious little blondiess started out as a gluten free cookie recipe experiment hence the amount of butter in the recipe. (I'll work on a lower fat version next ;) The batter ended up being too soft for cookies but perfect for bar cookie (blondies!), mini muffins, or if you want something prettier, spoon the batter into different shaped baking pans to suit the season, or your mood. I'm always in the mood for love, so I used heart shaped baking pans! <3 The end result is completely melt in your mouth, soft, sweet, and delicately delicious. The taste and texture reminds me of a cake donut. YUM!!!!!!!

Buttery delicious goodness.... need I say more?

Gluten Free White Chocolate Pumpkin Blondies

1 c unsalted butter, softened
1 c organic brown sugar
1 c organic cane sugar
2 eggs
1 c pumpkin puree (fresh or canned)
2 tsp vanilla
2 tsp cinnamon
1 tsp ginger
1/2 tsp nutmeg
3/4 tsp salt
1 tsp baking powder
2 1/2 c gluten free flour blend (Trader Joe's brand or your favorite)
1.5 c white chocolate chips

Preheat oven to 375*F

Grease a 13"x 9 " baking pan with coconut oil, butter, or fat of your choice.
In a large mixer bowl, cream butter and sugar until light and fluffy, scraping down the sides of the bowl as needed. Add in eggs, one at a time, and mix well. Add in pumpkin, vanilla, spices, salt and baking powder; mix until blended well. Slowly add in gluten free four and mix until a soft batter forms. Stir or mix in white chocolate chips. Spread batter evenly into a prepared 13"x 9" baking pan and bake at 375* for 25 - 35 minutes or until edges are golden brown and a knife inserted in the center comes out clean. Remove from oven and let cool before cutting up into bars, serving, and DEVOURING!  ENJOY! <3


Sunday, June 3, 2012

Chocolate Chip Picnic Cake

Hello, world!!!!! It's finally Summer time in NY!! And you know what that means, don't you? Yes! It's time to have lovely picnics in the park, go to outdoor concerts, drink too many mimosas, dance the hot summer nights away, and just have fuuuuuuuuun!!!! I created this delicious little cake for a picnic my bf and I had at the park with a few friends a few weeks ago and I have to say this is one of my favorite recipes to date. :) I was in a bit of a rush to get something made for the picnic, waking up at 11 am and scheduling a picnic for 1 pm is not a good idea... *cough* My bf had a hankering for chocolate chip cookies but I wanted something quick that I could just throw together and take to the park easily... So! I based this cake on my recipe for chocolate chip cookies (not yet posted), and the flavor is awesome!!! It's sweet and caramel-y from the melted sugar, and the chocolate and peanut butter chips demand your taste bud's attention!!! Haha! Feel free to substitute whatever flavor chips you like instead of peanut butter or just use all chocolate!!!!

Chocolate chippy goodness in a cake!!!!! Moist and delicious, your taste buds will thank you for every bite. ;)

Chocolate Chip Picnic Cake

1 c butter
1 c sugar in the raw
3/4 c sucanat (or dark brown sugar)
1/4 c honey
1/4 c sour cream
1 TBL vanilla extract
3/4 tsp salt
1 1/2 c whole grain spelt flour
2 tsp. baking powder


1 15 oz. can red kidney beans, rinsed and drained
3 eggs


1 c chocolate chips
1 c peanut butter chips

 In a large saucepan, melt butter, sugars, and honey over medium heat. Stir constantly with a wooden spoon or a wire whisk to prevent burning. Whisking the mixture while it's boiling keeps the butter and sugar from separating. Please be careful while stirring, caramel mixture will be VERY HOT!
Remove from heat and let cool 10 - 15 minutes.

Preheat oven to 350*F. Butter a non stick 13 x 9" baking pan and set aside.

Once sugar mixture is cooled down a bit, whisk in sour cream, vanilla, and salt.

Place eggs and beans in a blender cup and puree until smooth. Slowly add the sugar mixture to the bean mixture, pureeing the whole time. Add in the flour and baking soda and mix or blend until combined. Stir in chocolate and peanut butter chips and pour batter into prepared pan. Bake at 350*F for 30 minutes, or until top of cake is golden brown and a knife inserted in the center comes out clean.

This cake is DELICIOUS warm from the oven and equally delicious right from the fridge for a mid morning nibble before work... oops! Did I say that out loud? haha! ;) 

Happy eating!!!!!!!!!!!!! :)


Monday, April 23, 2012

Orangegasmic Chocolate Chip Orange Bars

Hello, people of the internet!! Oh how I have missed you!!! I've been away form you for so long... but don't fret because the wait was worth it! I've been really busy lately for two reasons. #1 - I have been rehearsing like crazy for my upcoming performance with Petrichor at Triabl fest 2012!!! WOOOOHOOO!!! I am so excited!! It' such a huge honor to dance at this festival these amazing women! And #2 -  I am moving into a new apartment next weekend!!!! So amidst all the madness of rehearsals and packing I managed to squeeze in some baking on a rainy Sunday morning to help calm my nerves. I had been itching to try out some new ingredients I had in my pantry and the result was mouth watering delicious chocolatey orange goodness!! These are also extremely high on the nutrition front because they use extra virgin coconut oil and coconut sugar (which is low glycemic and high in vitamins!!!)  Coconut sugar is very pricey though so if you can't splurge on it, feel free to substitute your favorite raw sugar in it's place.  :) Did I  mention these were gluten-free too???

My boyfriend couldn't stop eating these when they were fresh out of the oven. :) haha TRULY Orangegasmic!!!!!!!!
Orangegasmic Chocolate Chip Orange Bars

1 can (15oz) garbanzo beans, rinsed and drained
3 eggs
 1/3 c honey
1/2 c coconut oil, melted
1 1/4 c coconut sugar
2 tsp. vanilla extract
2 tsp. orange extract
1/2 c orange juice
1 oz unsweetened chocolate, grated
1/2 tsp salt
1 c brown rice flour
2 tsp. baking powder
1 c semisweet chocolate chips
Zest of 1 orange

Chocolate Glaze


1/4 c semisweet chocolate chips
1 tsp coconut oil

Preheat oven to 350*F. Grease a 13X9" pan with coconut oil or butter.

In blender, puree beans, eggs, honey, orange juice, coconut oil, coconut sugar, orange extract, and vanilla extracts until liquid and  beans are blended well. Add in grated unsweetened chocolate and blend. Combine brown rice flour, salt, and baking powder and add to batter. Puree for 30 seconds or until flour is blended thoroughly. Stir in orange zest and chocolate chips. Pour batter into prepared baking pan. Bake at 350*F for 25 minutes or until knife inserted in center comes out clean. Remove from oven and let cool before cutting into bars.

For the glaze - Place chocolate chips in a small microwavable bowl and  heat for 30 seconds at a time until melted.*** Stir after every 30 seconds to help melt the chips Stir in coconut oil. Chocolate should be thin enough to drizzle with a spoon easily. Add more coconut oil if it needs to be thinner. Drizzle glaze over the top of the bars in a zig-zag pattern. Sprinkle extra coconut sugar (just a pinch or two), orange zest, and mini chocolate chips on top of bars for a beautiful, finished look. :)


Makes 36 large or 48 small  Orangegasmic bars!!


*** If you don't want to melt the chocolate chips in the microwave, you can melt them on your stove top with a double boiler.

These are amazing warm from the oven!!! They would make a truly sinful dessert with ice cream or whipped cream on top. *drooool* ;)  These are best served warm or room temperature. 

Read more about the benefits of coconut sugar here. And while we're at it... you can  read about the benefits of extra virgin coconut oil here too!

See you next time!!!!!!!!!! *shimmy shimmy*


Monday, March 19, 2012

Apple Oaties - The best breakfast cookies!


I found myself lost in a sea of apples after a dinner party my boyfriend and I hosted a few weeks ago after  I made apple cobbler for the very first time in my life. It was a success, but in my worried state of having never baked an apple dessert before, I was overzealous and bought more apples than I knew what to do with!! Then the gears in my brain started to turn and these delicious little breakfast gems were born! They are hearty cookies PERFECT for grabbing as a quick breakfast that will keep you powered throughout your morning. They are full of real apple chunks, whole grains and oats, and lightly sweetened from honey and raw sugar. They make me smile and i hope they make you smile too! :)

These little muffin like cookies are great for breakfast but don't worry, they can be enjoyed any time of day!

Apple Oaties - The best breakfast cookie!

1 c butter
1/2 c honey
1.5 c sugar in the raw
4 large baking apples*, peeled and chopped** (approx 4 - 5 cups)
1 tsp cinnamon
1.5 tsp ginger
2 tsp vanilla extract
2 eggs
2 1/4 c whole grain spelt flour (or whole wheat)
1 tsp salt
1 tsp baking soda
1 tsp baking powder
3 c old fashioned rolled oats

In large saucepan combine butter, honey, and sugar. Cook over medium heat, stirring constantly, until butter and sugar are melted. Stir in chopped apples and let the mixture boil 5-10 minutes, stirring to prevent sugar form burning. Remove from heat and let cool to room temperature, about an hour.

Heat oven to 375* F.

Once apple mixture is cooled, whisk in eggs, vanilla, and spices.

In a large mixing bowl combine flour, baking soda, baking powder, and salt. Stir dry ingredients into apple mixture until well combined. Stir in rolled oats. Refrigerate dough for 1/2 hour to prevent too much spreading.*** Drop tablespoonfuls of batter onto lightly buttered cookie sheets. Bake at 375 for 8 - 10 minutes or until browned on the bottoms.

Makes approx 4 dozen cookies

*I use McIntosh or Cortland apples! Yummy!!


**I peeled the apples in this recipe but since apple skin is full of fiber and vitamins you can also leave the skins on. It will give you even more more nutrition and make for less prep work!

*** Refrigerating the dough is optional but it will help the cookies keep their shape better during baking.

Sunday, February 12, 2012

Decadent Chocolate Truffles

I've been MIA lately trying to come up with new baking experiments but none of them have been blog post worthy... :( But!!!! Just in time for Valentines Day I came up with an EASY and delicious homemade chocolate truffle recipe. I am so happy with how they came out! They are the perfect little treat to satisfy those cravings for sweets we all have (I know i have them multiple times a day)... and get this! They're SO good for you too!! I make them with extra virgin coconut oil as a base and this gives them a luscious melt in your mouth texture! I also use a stevia to cut down on the sugar content and agave nectar to balance out the bitterness that stevia sometimes has. What better way to say "I love you" than with some luscious handmade chocolate truffles? I don't think there is a better way... well except for actually SAYING I love you... but that's not the point! Go make your special someone some truffles!!!! Or just make them for yourself, you're worth it. ;) haha!


"I love ME" Dark Chocolate Truffles

3/4 c extra virgin coconut oil
3/4 c cocoa powder
1 oz unsweetened baking chocolate

6 packets stevia in the raw (about 2 tsp)
6 TBL Agave nectar
3 pinches of salt
1 1/2 tsp vanilla extract
Lots of extra cocoa powder for coating the truffles


In a double boiler or in the microwave, melt coconut oil and unsweetened chocolate. Remove from heat and whisk in cocoa powder and remaining ingredients.

And now the fun part!! You can choose to make these pure dark chocolate truffles or you can divide mixture among some small ramekins or bowls and flavor each one differently! Here are some of my faaaaavorites!!

Flavor Variations:

Dark chocolate pecan - Just mix in pecan pieces to the chocolate mixture, this makes rolling them into balls a little more difficult but the taste is so amazing it's worth all the work.


Chocolate mint - Place 1/4 cup chocolate mixture into a small bowl and add 1/4 tsp. mint extract.

Chocolate Orange - Place 1/4 c chocolate mixture into a small bowl  and add 1/4 tsp orange extract.

Espresso - Place 1/4 c chocolate mixture into a small bowl and add 1/4 - 1/2 tsp instant espresso powder.

After you make your flavors, cover and refrigerate for 1/2 hour or until the truffle filling sets. When you're ready to roll the filling into balls (This part gets messy!!!), put 1 or 2 TBL of cocoa powder onto a plate and cover the palms of your hands with cocoa powder to prevent the filling from melting all over your hands. For small truffles scoop out 1/2 tsp filling  and for larger truffles scoop out 1 tsp filling and roll gently between the palms of your hands until it forms a smooth ball. (for the pecan ones, you may have to manipulate the filling a bit more by squishing it in your palms to make it stick together since there are alot of pecan pieces) Roll the truffle ball into the cocoa powder to coat. Put more cocoa powder onto your palms and repeat until all of the filling is used up!

Place truffles in a small container and keep refrigerated. These are a melty mess at room temperature.

Makes approx 36 truffles. (more or less depending on how big  you make them)

Enjoy. ;)

Tuesday, January 31, 2012

Gluten Free Lemon Coconut Raspberry Bars

Lemons lemons and more lemons!!!! hahaha :) I have been on a bit of a lemon kick lately, but this was a special recipe I came up with for my amazing belly dancing teacher Darshan! She loves all things lemony and she tries to eat gluten free. I also had some leftover coconut milk from a soup I had just prepared so I figured what the heck... let's make some coconut lemon bars! I am very excited about this recipe because it was another experiment with beans and it came out absolutely delicious with no hint of bean taste!!! These lemon bars are very rich and moist from using full fat coconut milk and extra virgin coconut oil. If you want a little bit lighter version you can substitute lite coconut milk for the full fat milk! 

Rich, moist, sweet and delicious. These lemon bars are healthy decadence!

Lemon Coconut Raspberry Bars

1 15oz can garbanzo beans, drained and rinsed
3 eggs
1 c coconut milk
1/2 c coconut oil, melted
1/4 c fresh squeezed lemon juice (approx 1.5 lemons)
1 1/2 tsp vanilla extract
2 tsp lemon extract 
1/2 c agave nectar
1 1/4 c sugar in the raw
Zest of 1 lemon
1/2 tsp salt
2 tsp baking powder
1 c brown rice flour
1 c raspberries (fresh or frozen)

Preheat oven to 350*F. Grease a 13X9" baking pan with coconut oil and set aside.

In blender or with a hand mixer blend all ingredients except baking powder, flour, and raspberries, until smooth. Pour batter into a large bowl and whisk in flour and baking powder. Mix just until combined and there are no lumps in the batter. Fold in raspberries and pour batter into prepared baking pan. Bake at 350*F for 25 minutes or until knife inserted in center comes out clean. Remove from oven and let cool before cutting into bars.

Makes 36 large or 48 small bars. 

These are best served room temperature. They are moist and delicious!!!!

Enjoy ;)                                                                                                                                                                   

Saturday, January 21, 2012

Sunshine in a Muffin!

It was a cold and snowy day in New York and since the sun wasn't shining so brightly I wanted to make some sunshine of my own... and what better way than to bake some awesome muffins? These little lemony treats will put a smile on your face and make you feel like the sun is shining on the darkest of days!!! (Ok... maybe I'm being a little cheesy but that's alright because these muffins also have an awesome lemony cream cheese filling inside. ;) Yum yum yum!!!!!


Lemon Blueberry Sunshine Muffins


1 c whole grain spelt flour (or whole wheat)
1/2 c brown rice flour
2 tsp baking powder
1/2 tsp salt
3/4 c raw cane sugar
(Sucanat or Sugar in the Raw)
2
tsp lemon zest (zest from 1 lemon)
1 egg
1/3 c melted butter
1/2 c plain unsweetened kefir
*
1/2 c milk
juice of 1/2 lemon
1 1/2 tsp vanilla extract

1 c blueberries (fresh or frozen, dust them with a little bit of flour before mixing in to keep them from sinking to the bottom of the batter)
Extra raw sugar to sprinkle on the tops of the muffins (optional)

Cream Cheese Filling:
4oz. cream cheese, softened to room temperature
2 TBL Cane sugar
juice of 1/2 lemon
1 tsp vanilla extract

Preheat oven to 375*F. Spray 12 cup muffin pan with cooking spray, or line them with paper muffin liners and set aside.

In a large mixing bowl sift together spelt and brown rice flours, baking powder, and salt. Stir in sugar and lemon zest. Make a well in the middle and set aside.

In a small mixing bowl whisk together egg, melted butter, kefir, lemon juice, milk and vanilla. Pour wet ingredients over flour mixture and stir until just combined and batter is moist. Fold in blueberries.

In another small mixing bowl, beat cream cheese and sugar until smooth. Slowly add in lemon juice and vanilla and beat until combined. Set aside.

Place heaping tablespoonfuls of batter into muffin cups. make slight indentations into the batter of each muffin with your finger (or a spoon) and fill it with 1 heaping tsp of cream cheese. Top with another tablespoonful of batter to cover filling. If desired sprinkle the tops of each muffin with a bit of extra raw sugar, this will add a delicious crunchiness to the tops of your muffins! Bake at 375*F for 20 - 23 minutes. Remove from oven and cool before serving.

Makes approx 12 muffins.

There will extra cream cheese filling left over after filling the muffins that you can use as a delicious spread. :)

Enjoy every delicious bite of lemony sunshine!!!!


* Kefir is a pro-biotic yogurt drink, you can usually find it in the dairy section of your grocery store. It's full of good bacteria that is great for your digestive system and it's 99% lactose free!! You can read more about the benefits of kefir here. If you don't want to use kefir you can substitute plain yogurt.

Monday, January 16, 2012

Pumpkin Pie Bars

I have to admit that I am a bit obsessed with the idea of using beans in my baking... I am going to experiment with beans until there are no experiments left to be experimented on. Last fall I was inspired by the bounty of beautiful pumpkins and squashes to choose from. I've never been a big fan of pumpkin pie, but it IS an American tradition, so I decided to take a stab at creating my own healthy, and yes, BEANY bar version. And, as it turns out... I really love these bars (more than pumpkin pie!!!!) The beans give them a very pie like texture.:D

Sugar and spice and everything nice. Pumpkin pie in the palm of your hand!
 Pumpkin Pie Bars

1 15oz. can no salt added garbanzo beans, drained and rinsed
1/2 c melted butter
1/2 c soy milk
(or any other milk you like)
3 eggs
1TBL Vanilla
1/2 c agave nectar
2 tsp fresh grated ginger
(or dried ginger powder)
2 tsp fresh grated nutmeg (or dried)
1 TBL ground cinnamon
3/4 tsp salt
2 tsp baking powder

1 1/2 c raw sugar (Sucanat or Sugar in the Raw)
1 15 oz. can pumpkin puree (not pumpkin pie filling)

3/4 c whole wheat flour (I use whole wheat pastry flour)


Preheat oven to 350*F. Prepare a 13X9" baking pan with cooking spray, butter, or oil. Set aside.

Blend eggs, beans, milk, butter, and pumpkin in a blender until smooth. Blend in agave, spices, salt, and baking powder. Pour batter into a large mixing bowl and whisk in sugar. Add flour and whisk until combined.

Pour batter into prepared 13X9" baking pan and bake at 350*F for 35 minutes. Remove from oven and cool completely before cutting. (Bars will still be mushy, they set completely when refrigerated.) 
Serve at room temperature or cold.

These will stay good for a week when kept refrigerated.... and are very delicious with whipped cream on top!


Makes 36 - 48 bars. It all depends on how you cut it!


*Feel free to adjust the spices according to your taste with this recipe. I personally like A LOT of spice in my pumpkin bars.

This recipe can easily be made gluten free by substituting brown rice, oat, or any other non wheat flour for whole wheat.

Sunday, January 15, 2012

Bananas and Rum!!!

Yo-ho-ho and a bottle of rum!!!!! This recipe came about when I had some overripe bananas, a bottle of rum and a dream... a dream to make some delicious, healthy oatmeal cookies that would remind me of Bananas Foster. There's almost nothing better than that caramelized brown sugar taste drenched in rum... ooohhhh yes... haha!  The experiment was a success and my cookies won the approval of everyone at my work, one woman in particular who is from Jamaica told me they reminded her of home. :) 

The goodness of bananas and oatmeal all rolled into one... with just a splash of rum! Yum yum. ;)

Banana Rum Oatmeal Cookies


Preheat oven to  375*F. Spray cookie sheets with non stick cooking spray and set aside.

Over  medium heat in large saucepan melt the following ingredients:

1 c unsalted butter
1/2 c raw cane sugar (Sucanat or Sugar in the Raw)
1 TBL honey


Stir frequently with a wire whisk while melting. Whisking the mixture while it's boiling keeps the butter and sugar from separating. Please be careful while stirring, caramel mixture will be VERY HOT! Remove from heat, and whisk in:

1 c organic brown sugar

Let hot caramel mixture cool 10 - 15 minutes and whisk in:

1 c mashed overripe banana
1 TBL vanilla
1 egg
1/4 c good quality rum
(my pirate boyfriend has taught me Cap'n Morgan's is best ;)

Stir in :

1 tsp salt
1 tsp baking powder
1 tsp baking soda
2 1/4 c whole grain spelt flour (or whole wheat flour)


Mix well and stir in:

3 c old fashioned oats (I use Bob's Red Mill brand Thick Cut Oats)
1 c pecan pieces (or whatever nuts you like)
3/4 c raisins


Batter will be thick. Place heaping tablespoon fulls of batter onto lightly oiled baking sheets, one inch apart. Bake for 375*F for 8 - 10 minutes or until lightly browned and cookies are firm but soft. Remove from oven and let cool for 5 minutes before transferring cookies to a wire rack or a plate to cool.

Makes approx 4 dozen cookies (more or less depending on how big you make them).

These are great for breakfast on the go too!!!
 
** Baking tip of the day: Honey absorbs and retains moisture, so your homemade baked goods stay fresher longer. Use a light colored honey for less strong of  a honey taste in your baked goods (unless you WANT them to taste like honey). The darker the color of your honey, the stronger the flavor.

More tips on baking with honey.

Saturday, January 14, 2012

Delicious Nutritious Bean Brownies!!!

Have you ever heard of the fabled Black Bean Brownie?  The original recipe I heard of was published in a Weight Watchers cookbook to give dieters a lower calorie version of their favorite treat while staying on their WW program. There are many different variations out there on the internet and I tested and tweaked many to come up with this tasty and healthy recipe. My recipe contains no refined flour and thus it is a delicious gluten free treat you can give to your GF friends! This is one of my favorite treats when I am trying to "be good" on my diet. :)

Moist and chocolatey. The texture of these brownies are more cakey rather than gooey/chewy since I use very little butter to keep the calories low and beans instead of flour. Yum yum! :)
 Chocolate Bean Brownies aka Beanies!

Preheat Oven to 350*F. Butter an 8X8"baking pan and set aside.

In a blender, (or using a hand blender) blend the following ingredients:

1 (15oz.) can no salt added Red kidney beans, rinsed and drained *
3 eggs
1/4 c melted butter
2 tsp Vanilla extract
3/4 c raw sugar (Sucanat or Sugar in the Raw, etc.)
1/4 c semisweet chocolate chips (I use minis), melted

1/2 tsp salt
3/4 tsp baking powder


Once mixture is blended well, pour the batter into a large mixing bowl and whisk in:

1/2 c high quality cocoa powder

Mix until batter is thick and there are no lumps of cocoa powder remaining.

Stir in:

1/4 cup miniature chocolate chips (yes another 1/4 cup... this makes yummy little mini chocolate bites in your brownies)


Pour batter into prepared 8X8" baking pan and bake at 350*F for 25 minutes. Knife inserted in center will come out moist but clean.

Let cool to room temperature before eating. These are best when they are refrigerated for a few hours or overnight to let the chocolate flavor develop. Beanies are best kept refrigerated and they will stay good for a week or longer (if you can stop yourself from eating them all in one day... haha).


Makes approximately 16 large beanies.

Enjoy!!  <3

* I have tried this recipe with numerous different kinds of beans and it comes out good every time with no noticeable change in flavor or texture

** Another note about these brownies. They will become very moist when refrigerated and have a slight wetness to the top. This is normal.

Flavor Variations:

Chocolate orange flavor - Add in 1 tsp orange extract, 1 TBL Orange zest, and juice of half an orange to batter before baking.

More flavor variations to come!!


Nutrition per serving 
150 calories
6 g fat
4 g protein